Stage 2: Planning Your Investigation
In
Stage 1, you selected a topic of interest, wrote a research question, and
looked for collaborators, if you did not have them already. In Stage 2, you will expand your question
into a research plan. To help you write a good plan, we outline the process in
six steps. As you complete these steps, please fill in Form #2: The Research Plan.
Overview
Here is some background
information about steps you will need to follow in this stage.
Materials and Procedures
What materials do you need in your experiment? These
materials should include:
- any instruments
you use to take measurements
- any equipment that you need, and
- any supplies or materials that you use.
What procedure should you follow?
The procedure includes the steps
you will go through to collect the data. Describing the procedure completely
and accurately is important so that others can repeat your investigation if
they want.
Here's an example:
Using a temperature probe,
a student research team plans to measure how the water temperature of a stream
changes at it flows past an electric power facility. The team's materials
include the temperature probe, a meter stick, and a tape measure. The team's
procedure explains precisely how to measure the water temperature, where in the
stream to take those measurements, and when to take them.
The Data Table
The data table for your project
will hold the information you collect during your investigation.
A data table consists of rows and
columns. The rows contain the entries. To define a data table, label the
columns that will hold the numbers and other kinds of information that you will
collect. Generally, these columns are named after the categories and
measurements in your investigation. Think of each row of data as an event, captured
with a snapshot. The columns capture the details that make that snapshot
important.
Our example continues:
In the water temperature
investigation, the researchers measured water temperature at two locations at
the same time of the day. temperature above the plant temperature below the
plant time of day. They also
record the date of the measurement, the air temperature, and the team taking
the measurements. date of measurement air temperature in shade team name
Sample table:
The table for this example
now has six columns. When the researchers enter data, they create a new row for
each set of measurements. Filling in the row is like taking another
"snapshot" of the stream at a different time to see which variables
in the picture have changed.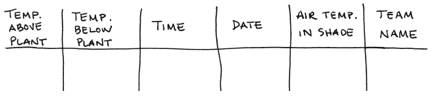
OK! Ready?
Step 1: Identify the materials you will need.
Give your project a title and
enter it on Form #2: The Research Plan. Collaborators will use the title to
locate your project, so choose a title carefully. You might try to use some of
your key words in the title. Rewrite your investigative question on the next
line.
Make a list of materials you will
probably need to carry out your investigation. Decide which materials are
already available and which ones you have to find. Include the instruments and
other tools in this list of materials.
Record the materials on the
Research Plan form.
Step 2: Describe the procedures you will follow.
Read over your research question
again and as a team decide exactly
what steps you will take to
conduct your investigation to answer this question.
Read the section Research
Strategies in the Resource Materials to
identify the best approaches for answering your question.
What do you want
to find out?
Can you measure
that kind of information?
How can you make sure your
measurements are accurate? How do you make them reproducible, so that others
might repeat your experiment?
Remember, as you work through
these steps, you may have to revise your investigative question.
Write these steps in your journal
and discuss them carefully as a team.
Make sure you provide enough
detail so that someone else can perform each step exactly as you have performed
it.
Record your procedure on the
Research Plan form.
Step 3: Define the columns in your data table.
Think about the measurements you
will take and the other kinds of information you will record.
How many
different kinds of measurements will you take?
What kinds of information must
you record?
How many times will you take
these measurements? (Remember that answering these questions may take you back
to the "procedure" section to make revisions.)
Name the columns you want in your
table.
For measurements, include the
unit of measure in the column name. For example, the column holding the
values of the temperature in the shade might be "Temp Shade (C)" for
temperature in degrees Celsius.
Draw a "mockup"
table. This is a good way to check your work. Draw a table and label the
columns with the names you have chosen. Then fill in "mock" data in
the rows. Does the result seem complete? Could you answer your research
question with just that much information? Or do you need more? What is missing?
Are any of the columns really unnecessary?
Now that you have evaluated the
kinds of measurements you will take,
write the final column titles for
your data table on Form #2.
Step 4: Review and revise your research plan.
When you are satisfied with your
plan, take it through your review process. Make any changes that are necessary
and have the form signed and dated.
Step 5: Communicate with your collaborators.
Check your e-mail and Web page
throughout this stage for responses to your investigation idea. Are any other
teams interested in collaborating? If so, send them e-mail about the project,
thanking them for their interest and informing them about when you will post
the project. Always respond as promptly as possible. This will keep the
conversation with your collaborators alive. Make your messages as clear as
possible.
Complete the collaborator
guideline information:
Timeline When your investigation begins and ends.
Expectations What is required of participants; what you will
expect collaborators and other participants to do.
Eligibility Any special requirements; in our example,
collaborators must be near a stream.
Welcome page A brief message that welcomes them to the team.
Letter of
acknowledgment A brief note that is sent
to participants via e-mail.
At this point, you should also
review the projects posted by other teams. If you find one that is interesting
and you would like to collaborate with that team, send an e-mail. Now you are the collaborator. Be enthusiastic. Tell the team
why you are interested and how you will participate. Ask the team questions
about its school and its class. The more you can learn about the team the
better!
Step 7: Review each other's research plans.
Scientists continually check each
other's work to make sure the findings are accurate. This process is called
peer review and it is one of the finest, most time-honored traditions in
science. Scientists do this to support each other and to ensure that the
highest standards are being met.
We would like you to try peer
review by reviewing each other's research plans.
Read the sections Peer Review and
Constructive Criticism in Science in the Resource Materials.
Read the research plan from
another team and examines it for errors.
Criticism should always be polite, respectful, and constructive (isn't that how you want your plan reviewed?) and should also refer to the strengths of the plan.