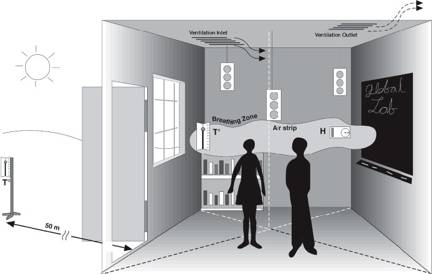
Sampling Airborne Particles: 3 Methods
Particles Strand Protocol
To evaluate particles as small as
10 to 100 microns in size (a micron is one millionth of a meter), you need to
build particle collectors that will capture airborne particles and install them
in different locations.
A. Flat Index Card Jelly Particle Collectors
These particle collectors collect
particles on exposed petroleum jelly. They are easier to construct than the
flat tape collectors, but the samples are harder to analyze. Flat jelly
particle collectors are most helpful if you only need to determine the quantity
of particles at different locations.
Materials
petroleum jelly
white index cards
scissors
string
Constructing Flat Jelly Particle Collectors
1 For each particle collector, lay an index card on the table with the
blank side up.
2 Using a pen, draw a square—approximately 3 cm to a side—on
each index card.
3 Spread petroleum jelly across the square. Try to cover the square
evenly.
4 If you are going to hang the collector, punch a small hole at one end
and run string through it.
Placing Flat Jelly Particle Collectors
Place collectors wherever you
wish to gather data, and label each with its location to simplify gathering and
analysis later on. Placement of your particle collectors will depend primarily
on what you are interested in learning or the nature of your research question.
Analyzing Your Collected Particles
After approximately a week,
gather your particle collectors. Examine the petroleum jelly with the naked eye
and estimate the apparent density of visible particles.
• How dark does the jelly appear?
• Can you arrange the collectors
from light to dark?
• Can you see any patterns? Can
you use the collectors to
map an area? Can you see any
patterns then?
B. Flat TAPE Particle Collectors
Materials
Clear adhesive tape
Construction paper
Scissors
Paper clips
Strings
Microscopes
Blank transparencies
Ruler
Fine point transparency marker
Constructing Flat Tape Particle Collectors
1. For each particle collector, cut two pieces of paper 8 cm in size.
2. Cut four aligned circles in one piece.
3. Touching the sticky side of the tape as little as possible, place strips of the tape on this piece so that the sticky side is exposed through all four holes.
4. Place enough strips so that the tape covers each hole completely, but make sure the strips are adjacent and do not overlap.
5. Secure the other piece with paper clips to the back of the first piece, making sure the sticky side of the adhesive tape remains exposed.
6. If you are going to hang the collector, punch a small hole at one end and run string through it.
Placing Flat Particle Collectors
Place collectors wherever you
wish to gather data, and label each with its location to simplify gathering and
analysis later on. Placement of
your particle collectors will depend primarily on what you are interested in
learning or the nature of your research question. Where do you want to collect data and why do you want to
collect at those locations?
Some locations that may be of interest
include your classroom, other classrooms, hallways, metal or woodworking shops,
industrial areas, roads or highways, and your study site.
Analyzing Your Collected Particles
First, to help you count the particles, prepare a grid on a transparency. Draw the lines 5 mm apart so that each cell is a square 5 mm by 5mm.
After about a week, gather your particle collectors and remove the back piece of paper from each. Lay each collector on the table with the sticky side facing up. Place a transparency grid over it. Examine each collector under the microscope. You should be able to see particles stuck to the tape.
Count the number of particles
visible within one cell and record the number. Perform this procedure for at
least four randomly selected cells within each of the four round windows for
each collector. Calculate the average reading for each collector. Can you
calculate an overall average particle count per square millimeter in the air?
Categorize the particles within
one cell. A microscope enables you to see both organic and inorganic particles.
Organic materials may include rug dust, human skin, pollen, and dirt’s organic
components. Inorganic materials may include chalk dust, paint chips, tire
treads, clothing fibers, and dirt’s inorganic components. Particles occur in
various shapes: triangular, square, round, round with appendages, and star. Can
you categorize the particles you collected? What seems to be the most common
shape?
Estimate the particle density of
each round window on the particle collector by examining the tape with your
naked eye. How dark does the tape appear? How do the four round windows in a
collector compare with one another? Can you arrange the collectors from light
to dark? Can you see any patterns?
C. Directional Tape Particle Collectors
These particle collectors collect
particles from different directions on different parts of an exposed adhesive
tape. The tape should be clear, because you will probably want to observe the
collected particles with a microscope. The idea is to identify sources of
various types of particles, including the most commonly-occuring particle type.
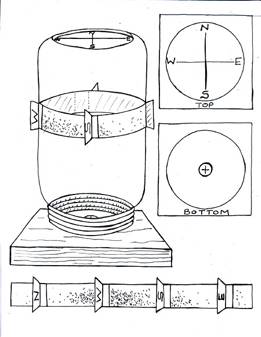
Materials
cans, jars, or other
cylindrical containers
white paper
clear adhesive tape
board (optional)
screw (optional)
compass
blank transparencies
ruler
fine-point transparency
Constructing Directional Tape Particle
Collectors
Wrap white paper around the
outside of a bottle or jar. Wrap sticky tape around the paper, making sure that
the sticky side of the tape faces outward. Secure the bottle on your collection
site. You may want to secure your collector to a board or other surface so that
it is stable.
Placing Directional Tape Particle Collectors
Place collectors wherever you
wish to gather data. Label each with its location and orientation (using the
compass) to simplify gathering and analysis later on. Placement of your
particle collectors will depend primarily on what you are interested in
learning or the nature of your research question.
Analyzing Your Collected Particles
After approximately a week,
gather your particle collectors. Carefully analyze the tape. Are the particles
uniformly distributed around the container? Are they concentrated on one side?
What can these particles tell you about their sources? If the collectors were
used
outdoors, what can they tell you
about prevailing wind directions? Is there a correlation between wind direction
and the number of particles collected?
To help you count the
particles, prepare a grid on a transparency. Draw the lines 5 millimeters
apart so that each cell is 5 mm by 5 mm. (Your grid should be larger than your
particle-covered tape.)
Carefully remove the tape from
around the container, place a transparency grid over it, and analyze the
particles under a microscope as explained for the Flat Tape Particle Collector.
Can you see differences in the types of particles collected from different
directions? Can you identify particle sources?